Explore & Find Camps
Discover hundreds of summer camps near you — filtered by sport, age, location, price, and more.
Opening the Explore Tab
Tap Explore in the bottom navigation bar, or tap Find Camps from your Home screen Quick Actions. Either way takes you to the same place.
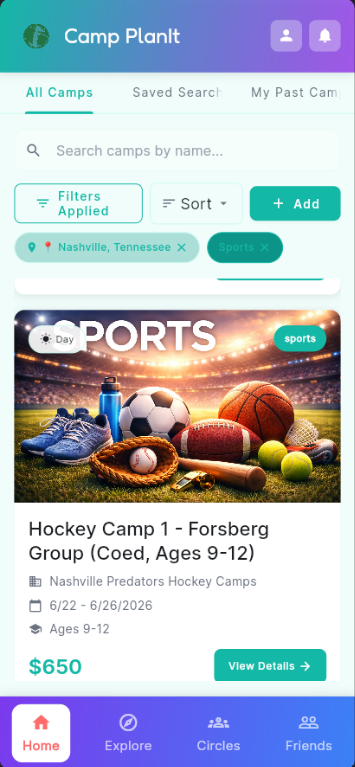
The Explore screen with filters applied
Three Views in One Place
At the top of the Explore screen you'll see three tabs:
- All Camps — Browse and search every camp in the directory.
- Saved Searches — Quickly re-run searches you've saved before. Learn more →
- My Past Camps — See camps your children attended in previous summers.
Searching for a Camp
- Tap the search bar at the top of the screen.
- Type a camp name, organization name, or a keyword like "soccer" or "art".
- Results update automatically as you type.
- Tap a camp card to open its full details.
Using Filters
Filters help you narrow results so you only see camps that fit your family.
- Tap the Filters button (the funnel icon near the search bar).
- Choose your filters — location, camp type (sports, arts, STEM, etc.), age range, dates, and price range.
- Tap Apply to see matching camps. A Filters Applied badge appears to remind you filters are active.
- To clear a filter, tap the × next to it, or tap Filters again and tap Clear All.
Setting Your Location
Camp PlanIt uses your location by default to show nearby camps. If you see a location chip (like Nashville, Tennessee ×) in the filter bar, that's the area currently being searched.
- Tap Filters and look for the Location field.
- Type a city or zip code, or tap Use My Location to let the app detect your area automatically.
- Tap Apply.
Sorting Results
Tap the Sort button to change the order results appear in. Sort options typically include:
- Relevance (default)
- Price: Low to High / High to Low
- Start date
- Distance
Reading a Camp Card
Each result shows a camp card with the key details at a glance:
- Photo — A photo of the camp or activity
- Category chip — The camp type (e.g., sports or arts)
- Name — Full camp name and organizing group
- Dates — Start and end date
- Price — Cost per child
- View Details button — Tap to open the full camp page
Adding a Camp to Your Planning
When you find a camp you like, tap View Details to open it. From the camp detail page you can set a Planning Status, add your children, and more. See the Camp Details help page →
Adding a Camp Not in the Directory
If you can't find a specific camp in Explore, you can add it yourself. Tap Add Camp from your Home screen Quick Actions and choose one of four ways to get it in:
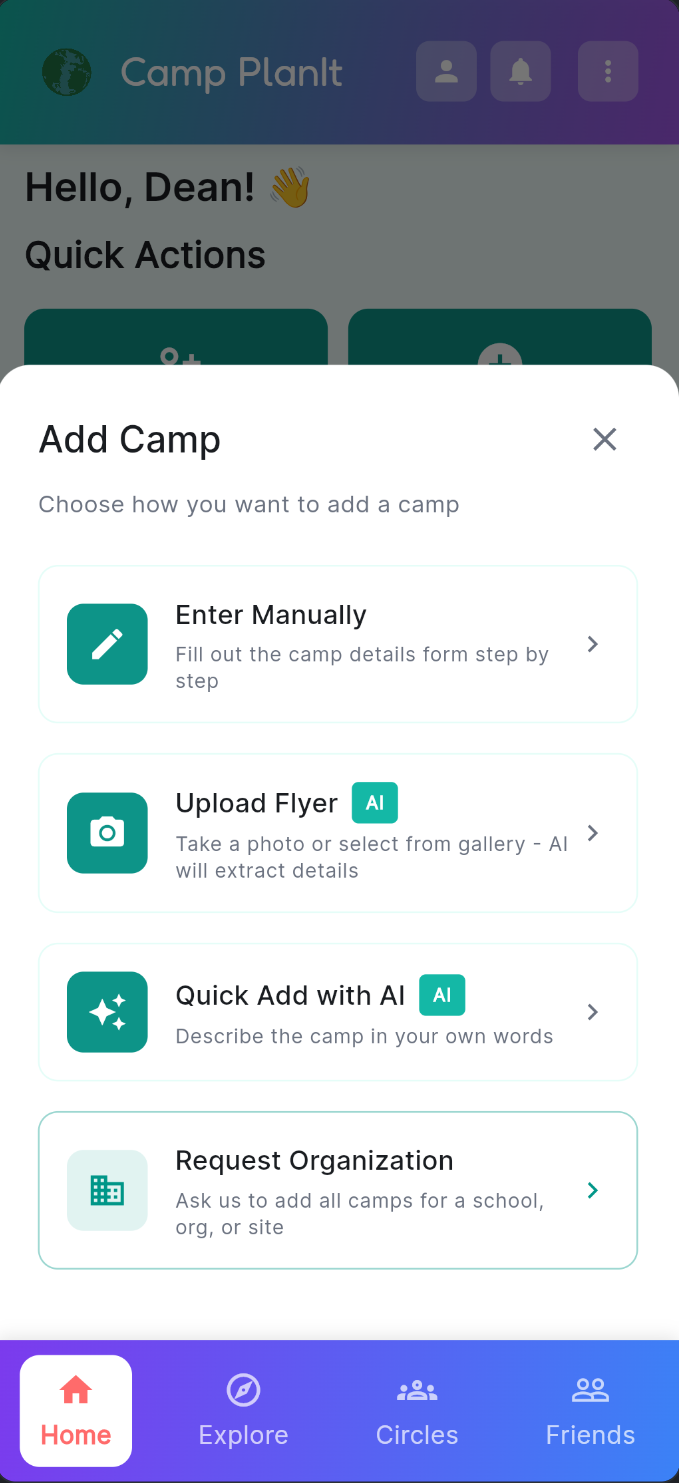
Four ways to add a camp to your planning
Enter Manually
Fill out the camp details form step by step — name, dates, location, price, and any other info you have on hand.
- Tap Add Camp on the Home screen.
- Choose Enter Manually.
- Fill in the fields and tap Save.
All four Add-a-Camp methods are free for every account — including Upload Flyer and Quick Add with AI.
Upload Flyer AI
Have a camp flyer — printed or digital? Let Camp PlanIt read it for you. The app uses AI to pull the camp name, dates, location, and other details straight from the image so you don't have to type anything.
- Tap Add Camp on the Home screen.
- Choose Upload Flyer.
- Take a photo of the flyer or select one from your photo gallery.
- Review the details the AI extracted, make any corrections, and tap Save.
Quick Add with AI AI
The fastest option — just describe the camp in your own words and the AI fills in the form for you.
- Tap Add Camp on the Home screen.
- Choose Quick Add with AI.
- Type a description of the camp — for example: "Riverside Soccer Camp, ages 8–12, July 14–18, $275."
- Review what the AI filled in, make any corrections, and tap Save.
Request Organization
If a school, YMCA, sports club, or other organization runs many camps, you can ask the Camp PlanIt team to add all of them at once. Submit the organization's name and website and the team will review the request and populate the directory.
- Tap Add Camp on the Home screen.
- Choose Request Organization.
- Enter the Organization Name and Website URL.
- Add any optional notes (specific camp types, age ranges, etc.) and tap Submit.
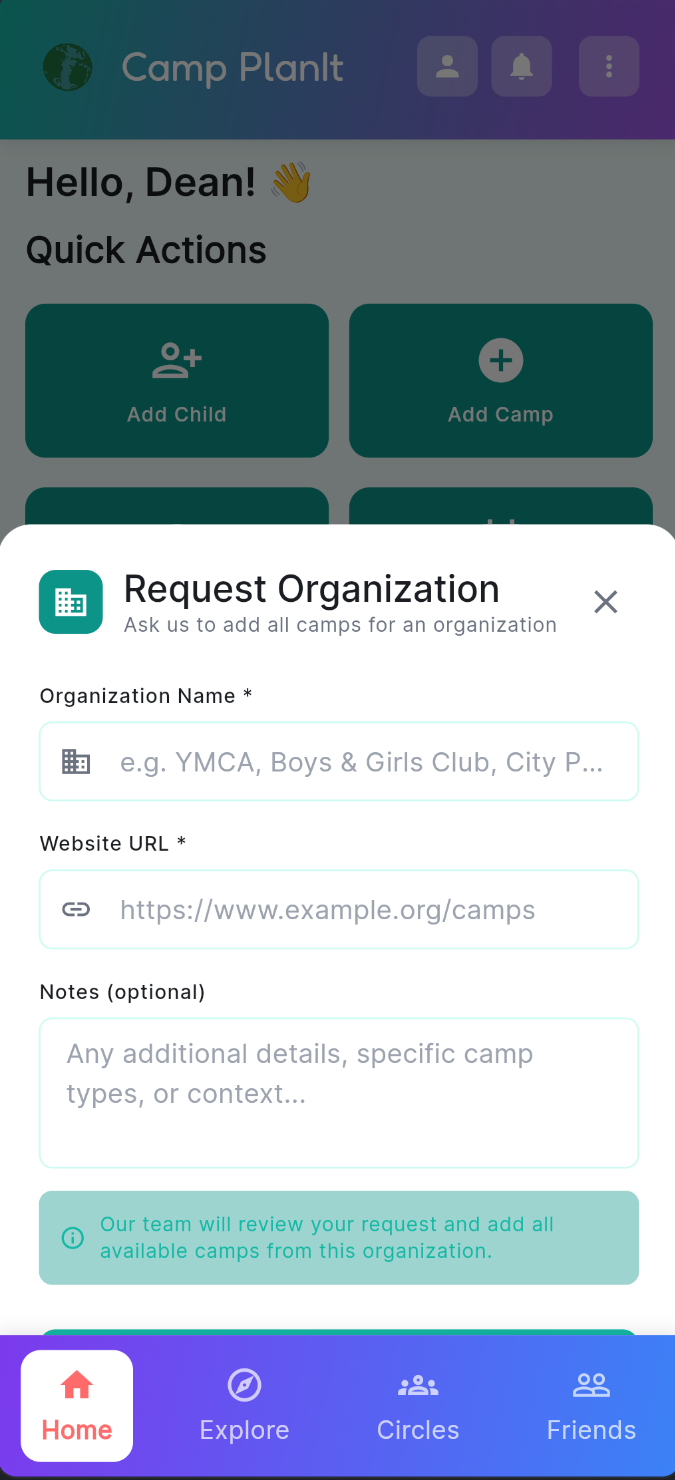
Submit an organization and the Camp PlanIt team will add all its camps